

Today I want to focus on how to organize your bills and create a filing system that works for you.
If you want to stick to a monthly budget, you need to keep track of all of your bills.
Prior to keeping a budget, my finances were a mess!

I didn’t organize any of my bills and never kept any of them together.
I had a few paper bills I would get in the mail, a couple of bills I paid online and some bills that were automatically drafted out of my bank account.
This was a really difficult way to pay my bills each month.
I finally realized that it would make my life so much easier if I could just sit down and spend some time putting together all my bills.
Once I started getting organized and sticking to a budget, I began to properly manage my expenses and organize my bills.
This also helped me reduce a lot of daily stress. Before I got organized, I never knew what day I was paying bills and it was always a surprise when I looked at my bank account.
Now I am much more organized and feel more in control of my life.
Here’s how I did it and how you can start organizing your bills too.
Related reading:
List Out All Your Bills
First, go through all your bills and list them out so you don’t miss anything.
To start, I went through every bill I had and made a list of how I received and paid each bill – snail mail, email, automated draft and automated phone call.
It is simple to write all this information down in a notebook. Since I have a new-found love for spreadsheets, here is an example:
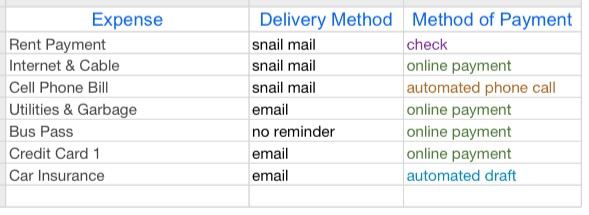
As you can see, this is just a small sample of some monthly expenses. There are already 4 different methods of payment happening with just 7 bills. That’s too much!
I evaluated my bills and decided which method of payment I would prefer to use for all or most of my bills.
As I am trying to reduce clutter and paper, I decided paying my bills online would be my preferred method of payment.
I created a new email address that would be strictly for receiving emails related to my bills.
This email also receives all the receipts after paying my bills. This is a very simple way to stay organized and keep your bills in one place.
Although it took some time, I went through each bill and signed up for eBills using my new email address. I was able to sign up with online billing with every bill I had. I was so excited to shred my paper bills.
Consider Automatic Bill Pay
Next, decide if you want any of your bills to be automatically drafted from your bank account using auto-pay.
One benefit of auto-pay is there will never be a late payment and no late fees! One downside to using auto-pay is accidentally over-drafting if you do not manage your bank account properly.
I decided to sign up with auto-pay for as many bills as possible.
Now that I am tracking my monthly budget and using a checkbook register spreadsheet, I know how much money I have at all times.
Plus, if I get busy with life, I don’t want to worry about accidentally forgetting to make a payment!
It is important to write down the date of auto-pay into your checkbook register spreadsheet. I like looking at my finances and knowing what day my payment will be drafted out of my bank account.
Also, many companies will work with you if you would like to reselect an auto-pay draft date.
I had several bills that all drafted out of my account at the beginning of the month and it really drained my bank account!
I was able to switch the due date to the middle of the month on a few bills for no additional charge. This really helped me juggle me expenses better and gave me some breathing room!
Track Your Expenses
This is a very important task to commit to if you’re going to organize your bills any pay everything on time.
You want to make sure you know what is coming in and what is coming out even if you decide to get help from an app or software system.
A great way to do this is with a spreadsheet. Below is an example of how it can look once you lay everything out.
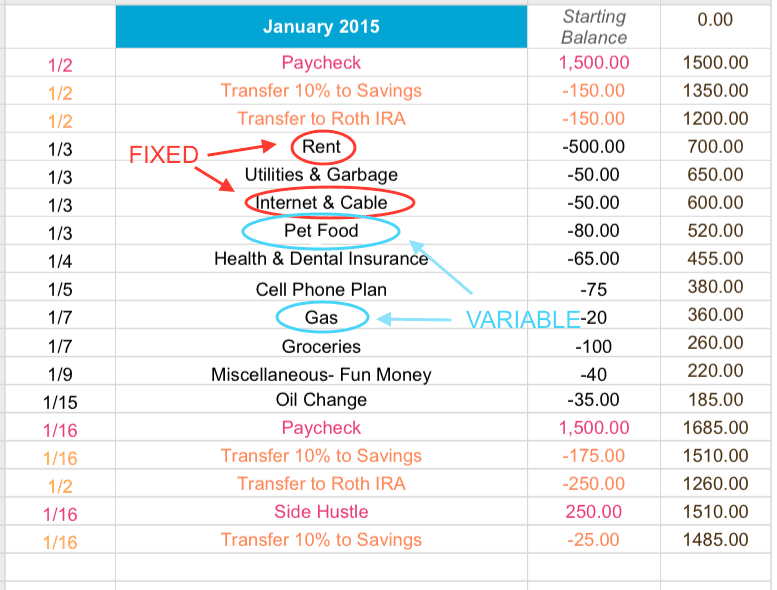
This check register spreadsheet correlates with the sample monthly budget spreadsheet from this post.
Here is how to make the check register spreadsheet work for you:
Step 1: Start the spreadsheet with your current bank balance. If you are starting from scratch, enter $0.
Step 2: Add all income expected for the month. I get paid every other week, so typically I have 2 lines of income for the month.
I record the dates of expected payment and paycheck total. I also look at my calendar to see if I have any extra income coming in to my bank account from mystery shopping and from one of my side hustles.
Step 3: Next look at all monthly bills. I listed all my “fixed” expenses for the month in order by due date and the bill total.
I also listed all the expected due dates for my other “variable” expenses. This includes bills such as my utilities.
I know the date the bill is due each month, but this amount is always changing. Based on previous bills, I made an educated guess for the expected amount due.
When in doubt, I guess high. I would rather plan for a higher bill and be surprised when it comes in lower than I expected!
Step 4: After listing all income and expenses, incorporate all expenses from the categories listed on the previously completed budget sheet.
This includes expenses such as grocery shopping, household items, pet food, etc.
For example, I grocery shop once every week or two and stick to a budgeted amount. I took this expense and add this to my spreadsheet. I even added the date I expected to go to the grocery store as it usually seemed to correlate to one of my days off from work!
I would suggest doing something similar to what I have mentioned above when it comes to applying these types of categorized expenses.
By writing down my planned expenses ahead of time, this helped me plan where my money is going each week!
Tip – I love to use different colors on my spreadsheets. Not only is it helpful to differentiate income versus expenses, it’s easier to read!